
|
EMR COMMUNITY NEWS
10/12/11
|
|
|

|
IN THIS ISSUE
|
|
e-Prescribe Refills – How to
Have you been struggling with e-Prescribe requests or were hoping for a quick refresher?
Today is your lucky day. The EMR team has put together an online refresher course
that will help ensure your prescriptions requests are replied to correctly and the
best part is that it will only take a few minutes to complete.
- e-Prescribe a New Medication
- Approve a Renewal Request
- Deny a Renewal Request
- Deny a request and Send a New Prescription Request
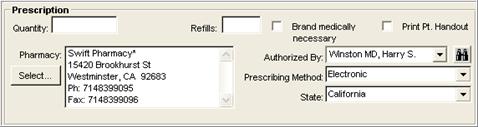
- Enter the new prescription as you normally would in Centricity Electronic
Medical Record.
- If the patient’s pharmacy is set up for e-prescribing, an asterisk displays next
to the pharmacy name on the New Medication screen. You can also select an e-prescribing
pharmacy by clicking Select and searching for a pharmacy with an asterisk.
- The Prescribing Method automatically sets to Electronic if you selected an e-prescribing
pharmacy.
- Complete the prescription by clicking Send/Print Rx button.
Pharmacies with Asterisks are set up for e-prescribing. The default method for e-prescribing
pharmacies is Electronic. Controlled medications cannot be e-prescribed.
Back to Index
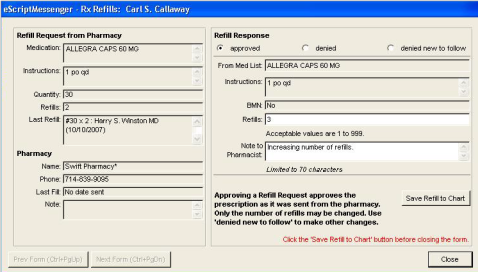
If a medication on the patient’s current medication
list exactly matches the requested
medication, it appears in the From Med List field. If a match is not found,
the Manual match required message appears, and you must select the appropriate
medication from the drop-down list.
- Click the renewal request document on your Centricity EMR desktop.
- Click Append.
- Click Click Here to Do a Full Update.
- Select the eSM encounter type set up by your eSM administrator and click OK.
By default, the eSM encounter type is called *eSM Rx Refill.
- A popup will appear asking you to sign this document. You must click Yes.
- Select approved.
- Verify that the From Med List Field displays a match from the patient’s medication
list. If there is not an exact match, the Manual match required message appears,
and you will need to select the appropriate medication from the drop-down list.
- If needed, change the number of refills.
- Verify the instructions from the patient’s chart located on the right side of the
form match the instructions from the pharmacy on the left side of the form. The
instructions from the pharmacy will be used if the refill request is approved. If
you want to change the instructions from the pharmacy, use the Denied New to Follow
workflow. You can also type a note to the pharmacist.
- Click Save Refill to Chart, and then click Close. The approval is
documented in the note to the pharmacist and in the patient’s chart.
If a medication on the patient’s current medication list exactly matches the requested
medication, it appears in the From Med List field. If a match is not found,
the Manual match required message appears, and you must select the appropriate
medication from the drop-down list.
- It is very important that you click the Save Refill to Chart button so that
the refill information is saved to the patient’s chart. If you do not click this
button, a warning is placed in the patient’s chart and the pharmacy will not receive
a refill response to the pharmacy-initiated refill request. Instead, the
pharmacy will receive a new prescription.
- Click End Update.
- Click Sign Document. The approval is sent back to the requesting pharmacy.
Signing the document also updates the patient’s chart and medication list. Signing
only the clinical list changes will not send the refill response.
Remember as a resident make sure to route your document append to the preceptor or
to the faculty pool.
Back to Index
- Click the renewal request document on your Centricity EMR desktop.
- Click Append.
- Click Click Here to Do a Full Update.
- Select the eSM encounter type set up by your eSM administrator and click OK.
By default, the eSM encounter type is called *eSM Rx Refill.
- A popup will appear asking you to sign this document. You must click Yes.
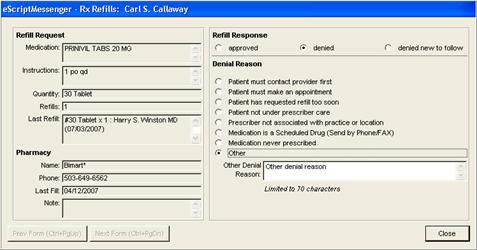
- Select denied.
- Select a reason for the denial.
- If the reason for your denial is not listed, click Other and type a reason
for the denial in the Other Denial Reason field.
- The denial reason you select from the list or typed into the Other Denial Reason
field is sent to the pharmacy.
- Click Close. The reason for the denial is now documented in the note to the
pharmacist and in the patient’s chart.
- Click End Update.
- Click Sign Document to send the denial back to the pharmacy. Signing the
- Document also appends the original document and updates the patient’s
- Chart. Signing only the clinical list changes will not send the refill response.
The reason for the denial is sent back to the pharmacy when you sign the document.
Remember as a resident make sure to route your document append to the preceptor or
to the faculty pool.
Back to Index
You can add or change a medication’s quantity, dosage or instructions by denying
the original request and following it with a new prescription

- Click the renewal request document on your Centricity EMR desktop.
- Click Append.
- Click Click Here to Do a Full Update.
- Select the eSM encounter type set up by your eSM administrator and click OK.
By default, the eSM encounter type is called *eSM Rx Refill.
- A popup will appear asking you to sign this document. You must click Yes.
- Select denied new to follow to deny the current request.
- Click Add/Change Medication.
- Add or change the medication including the quantity and number of refills. Make
sure the pharmacy selected for the prescription matches the pharmacy that requested
the renewal.
- Click OK. The new or changed medication now appears on the encounter form.
- Click Close.
- Click End Update.
- Click Sign Document to send the denial and the new prescription back to the
pharmacy. Signing the document also appends the original document and updates the
patient’s chart and medication list. Signing only the clinical list changes will
not send the refill response.
Remember as a resident make sure to route your document append to the preceptor or
to the faculty pool.
Back to Index
Back to Top
|
|
Cleaning your EMR desktop
� Tip of the Week
It’s easy to accumulate items on your desktop and having too many documents, alerts
or flags will make it difficult to find the ones you need. The tips below will help
you maintain a clutter free desktop.
Part I – Cleaning your Desktop Documents

How do I know which documents I can safely delete?
If the
of the document has been marked as
, the
as
and you have already reviewed the document then
sign it by double-clicking the file and selecting , or right-clicking on the document and selecting “sign” from the documents tab.
Once the document is signed, the document will no longer appear on your desktop.
If the
is
and the
is
then you need to review the document and once the
visit or document is complete sign if you agree with the contents.
If the
is
this indicates someone has the document open from
their EMR instance.
If the
is
and the
is
or
this indicates the documents still requires
your attention.
Remember Document management is best accomplished using the document tab on your
desktop.
Back to Top
|
|
EMR Known Issues
There
is
currently
1
EMR Known Issues:
- There is a delay on the orders placed by the physician to display on the orders
tab for MA’s to print and view.
As always we are working to resolve these issues in a timely fashion and will keep
you updated on their status.
Back to Top
|
|
|
|